How to Test and Replay WooCommerce Webhook Events on localhost with Hookdeck
WooCommerce is a free and open-source e-commerce plugin for WordPress. It is widely used by businesses and individuals to create and manage online stores. WooCommerce is highly customizable and offers a range of features.
Hookdeck is a webhook infrastructure service that helps developers receive webhooks, manage events and troubleshoot any issues quickly. It also provides the ability to expose a localhost server to the internet. This is useful for testing webhooks, as it allows developers to receive webhook requests from a service like WooCommerce on their local development environment.
In this article, I will show you how to test WooCommerce webhooks with a localhost Node.js Express application using Hookdeck.
Relaying your WooCommerce webhooks through Hookdeck provides an overall view and keeps track of every event that occurs.
We will cover how to:
- Set up a localhost webhook endpoint
- Create a Hookdeck connection
- Create a WooCommerce webhook
- Test WooCommerce webhook event to localhost app
Set up a localhost webhook endpoint
For this example, we are going to use the sample Node.js code from Hookdeck's repository. Feel free to follow up with any application or code you might have.
- Open up your terminal and clone the repository by running:
git clone https://github.com/hookdeck/nodejs-webhook-server-example.git
- Change into the cloned directory and install the dependencies.
cd nodejs-webhook-server-example
npm install
- Start the server by executing:
node server.js
The node.js server starts up on
http://localhost:1337. See the list of endpoints in theroutes.jsfile. We will make use of the/woocommerce-webhooks-endpoint.
Create a Hookdeck connection
There are several ways of creating a Hookdeck connection (see the guide here).
Create a Hookdeck connection with Hookdeck CLI
- Install the Hookdeck CLI.
- Open up your terminal and expose the localhost port with:
hookdeck listen 1337
- The Hookdeck CLI initiates the creation of a guest account that is used.
- You get prompted to do some basic setup:
- Create a new source (ex. WooCommerce)
- Set the path to be forwarded to as
/woocommerce-webhooks-endpoint - Name the connection label (ex. localhost-app)
- The connection is created and you are given a. A login URL to use for your Hookdeck dashboard b. The webhook URL needed

- Click and open the Login URL and see the same connection on your Hookdeck online dashboard
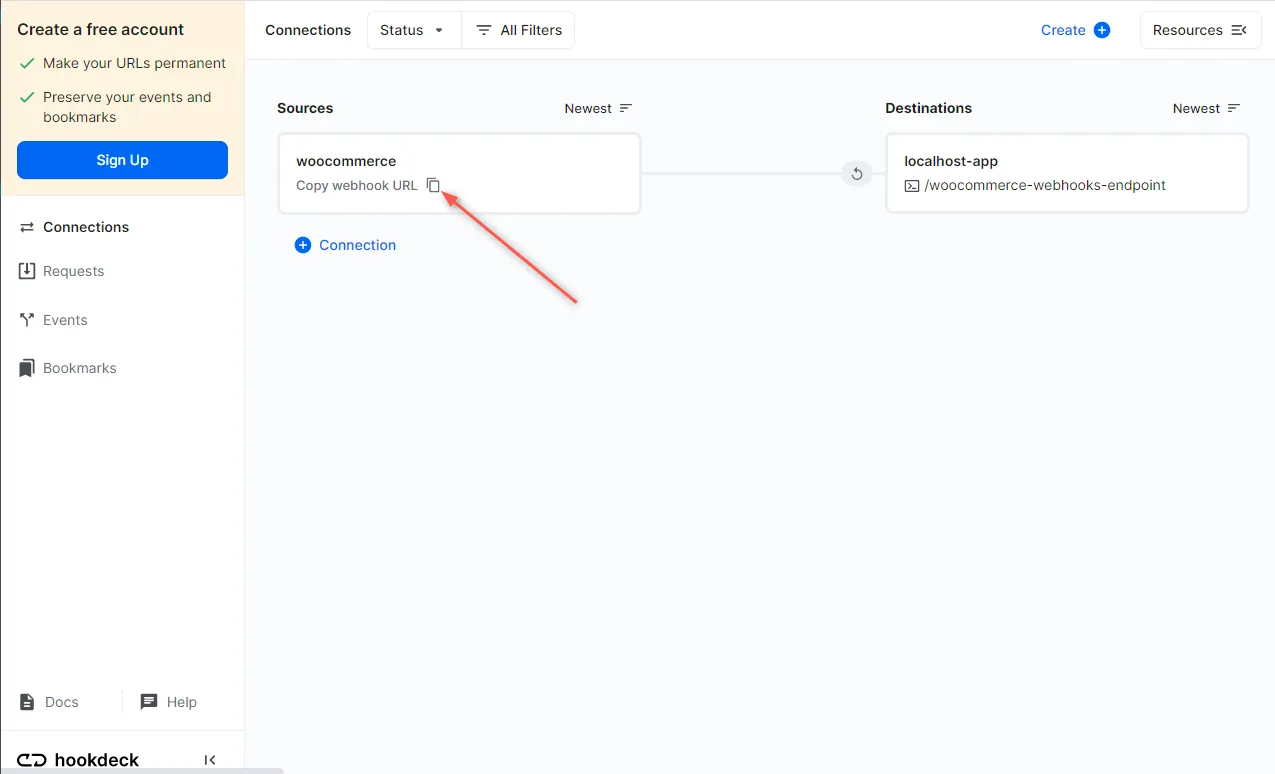
- Copy the WooCommerce source webhook URL. It is needed later in setting up the webhook listener.
Create a WooCommerce webhook
You are required to have WordPress set up with the WooCommerce plugin installed and a store created before creating a WooCommerce webhook.
To create a WooCommerce webhook:
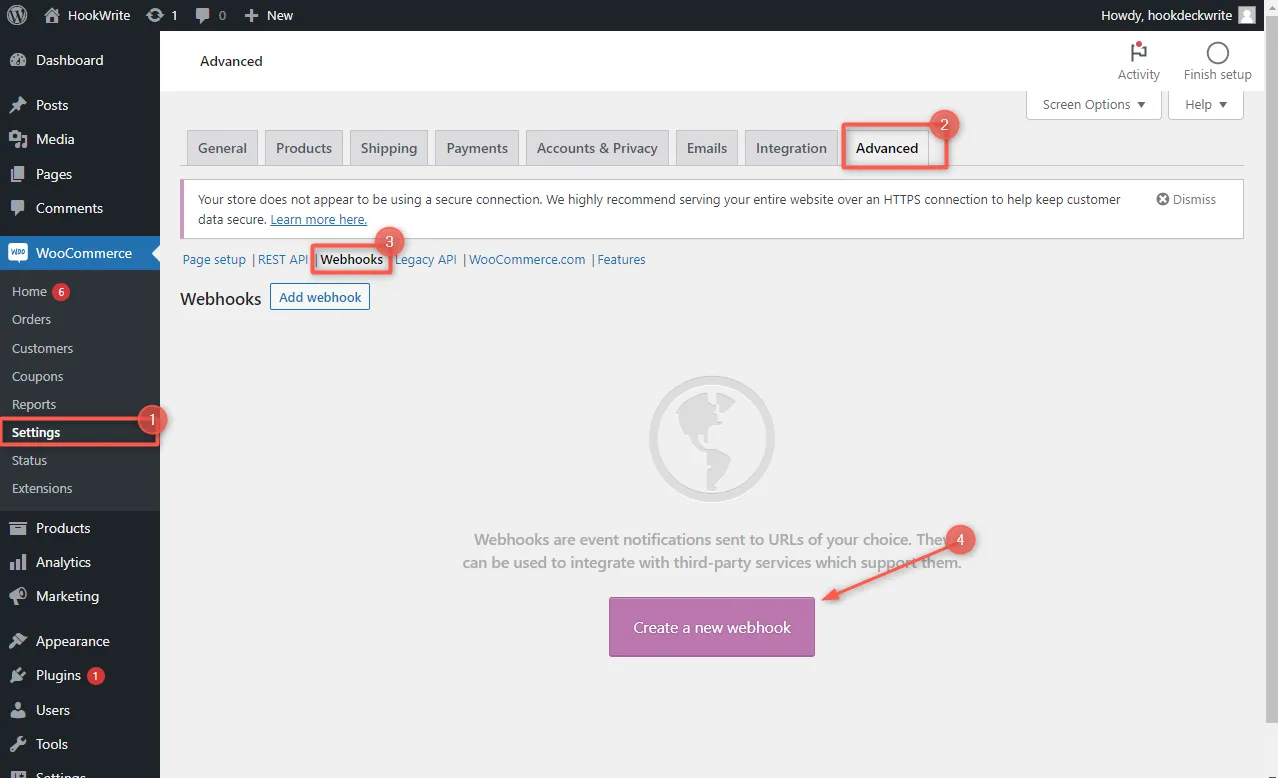
- On your WordPress dashboard, navigate to WooCommerce > Settings > Advanced > Webhooks.
- Click on Create a new webhook to create a new webhook.
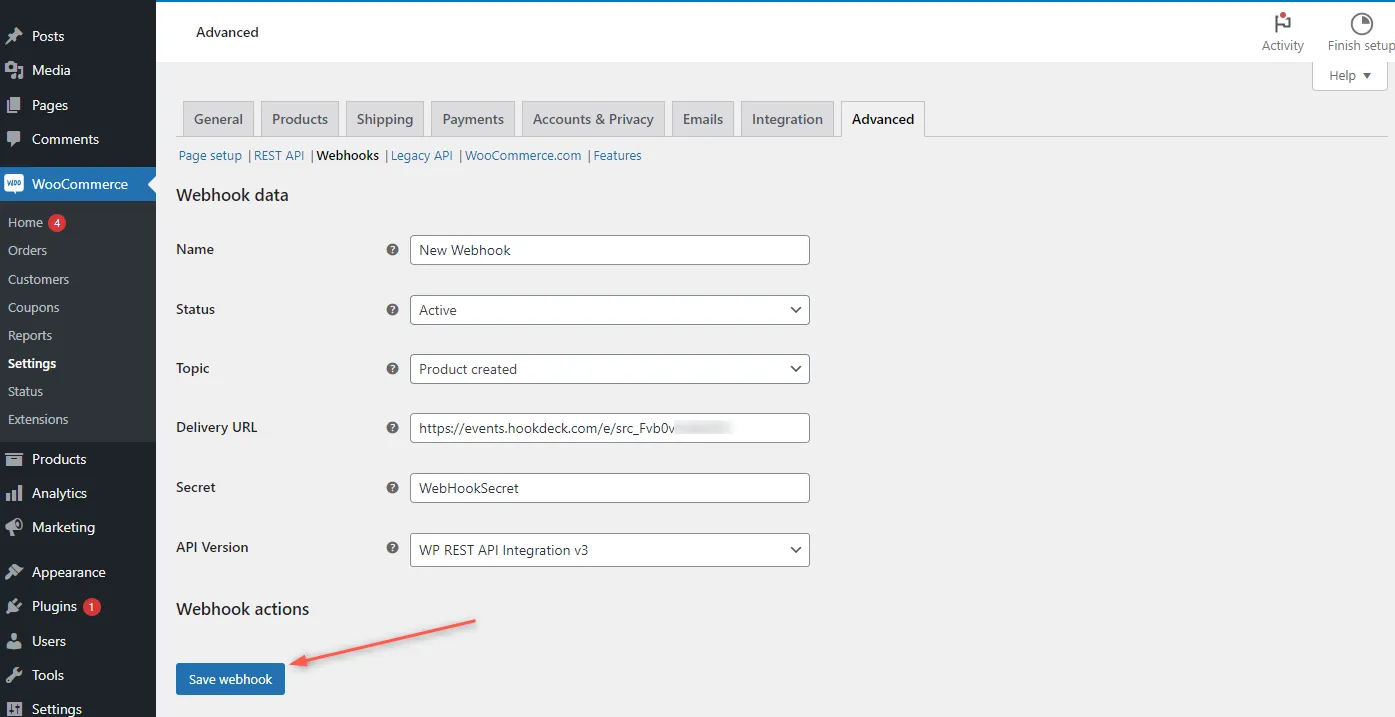
- Set the details about the webhook:
- Name: The name of the webhook.
- Status: The status of the webhook. Set this to
Active. - Topic: Select the event topic the webhook should listen to. Choose
Product created. - Delivery URL: Specify the delivery URL. Set this to the WooCommerce URL provided by Hookdeck from the connection created.
- Secret: Set the webhook secret to secure.
- API Version: A dropdown to select the API Version to use. Leave default.
- Save webhook.
Read more about WooCommerce webhooks here.
Test WooCommerce webhook event to localhost app
You have seen how to set up a localhost server, create a Hookdeck connection, and configure a WooCommerce Webhook. Let us test and trigger the Product created topic specified to make sure it is being received in our localhost application.
- From your WordPress admin dashboard navigate to Products > Add New to begin creating a new product.
- Set the product details and Save the new product.
- This triggers an event under the
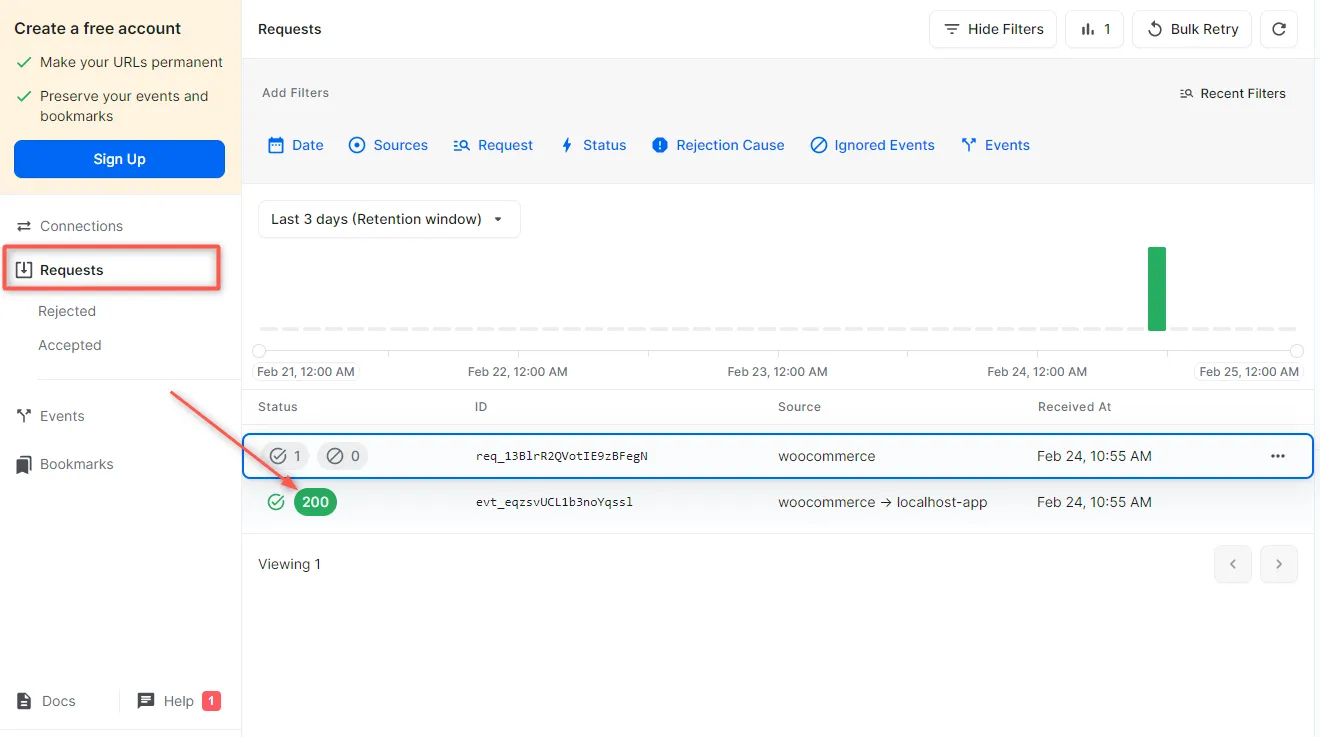
Product createdtopic the payload from the action gets relayed by Hookdeck directly to your localhost application. - On your Hookdeck dashboard in the Request section, you should see the requests received with a
200status code.
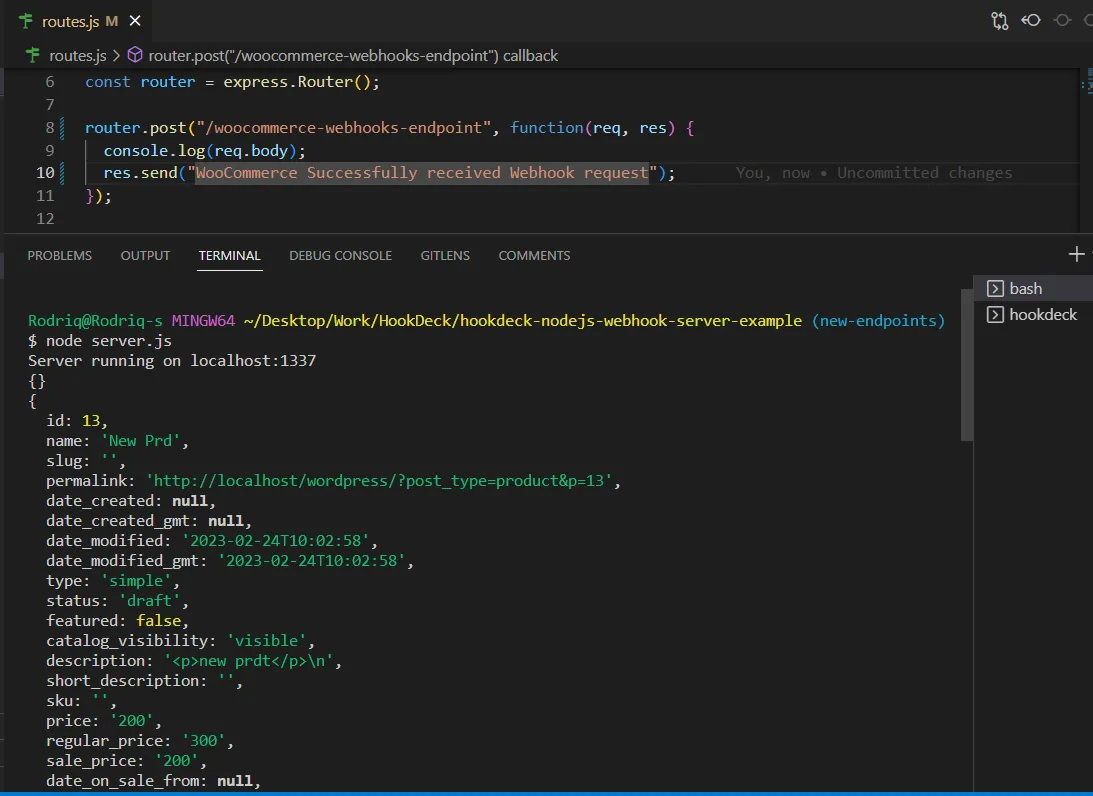
- Back in the terminal of the localhost application, the successful payload from the webhook is received and logged.
Retrying error or failed events
In case any failed events don’t make it to your destination for some reason, Hookdeck provides an ability for you to retry and attempts to deliver any failed or error event.
To retry a failed event:
- Navigate to the Events tab on the sidebar of your Hookdeck dashboard.
- Hit the Retry across the failed event.
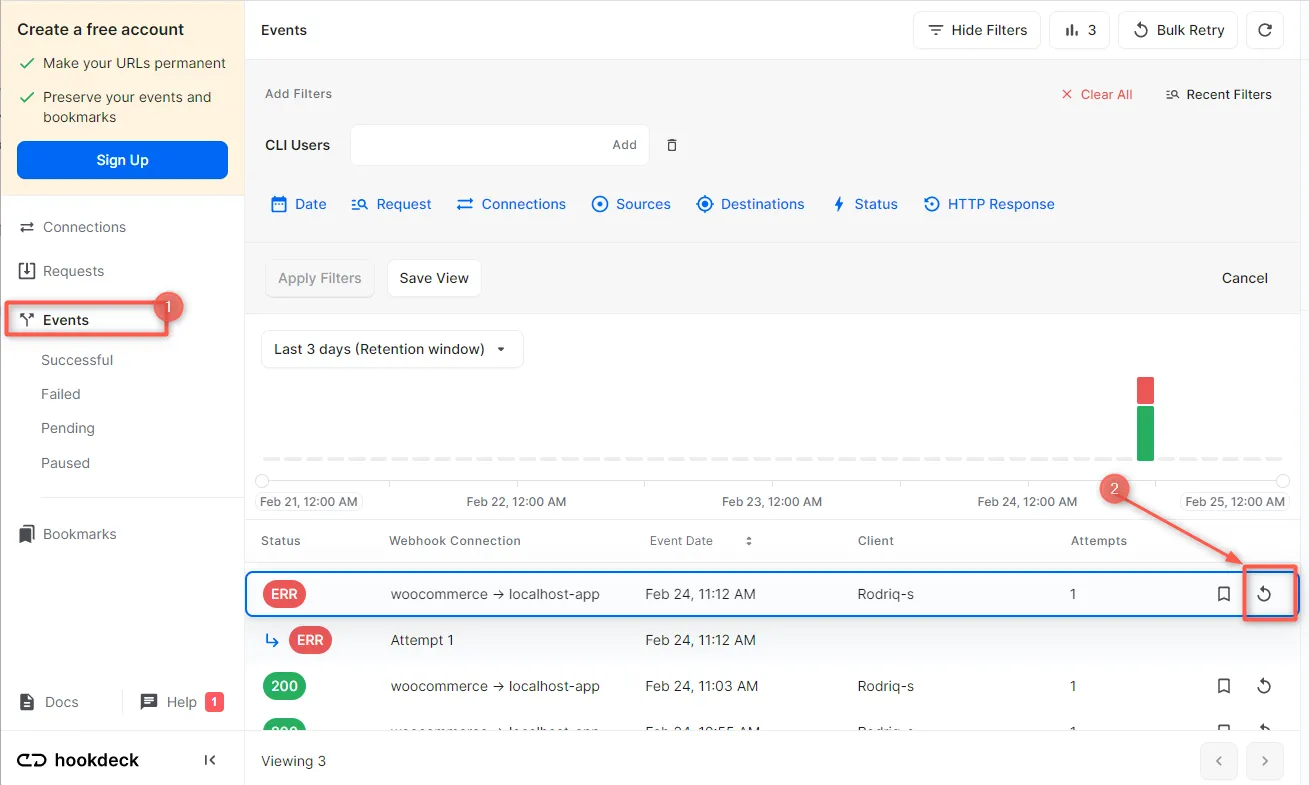
This replays the event again from Hookdeck to the local application.
A Hookdeck Request is an incoming webhook that Hookdeck receives from an external source. It contains the data that was sent by the external source as is (ex. from WooCommerce).
A Hookdeck Event is the webhook delivered by Hookdeck including configurations or filters applied to a destination (ex. to localhost app).
See more details on managing Hookdeck requests and events in the Hookdeck documentation.
Conclusion
In this guide, you learned how to receive WooCommerce webhook events through Hookdeck, a webhook infrastructure for reliable ingestion, to an application running on localhost.
Hookdeck can be used safely to consume, monitor, and troubleshoot your WooCommerce webhooks.